To be honest, there are many factors for above mentioned issues. However, one of the most underestimated factor is “Tube end preparation”.
Tube end preparation is one of the most important and critical processes in obtaining an optimum seal for any type of Flareless, flanged, brazed and flared tube end connection. Let’s Learn
When appropriately performed CDC, a three steps process will assure the integrity of your tube and prevents leakage in your tube fitting connections caused by improper tube end preparation.
These guidelines are similar for all tubes, regardless of the tube material.
Everyone to remember – CDC
C – Cutting
D – Deburring
C – Cleaning
Let’s understand in detail how these affects performance of a Tube fitting.
C – Cutting
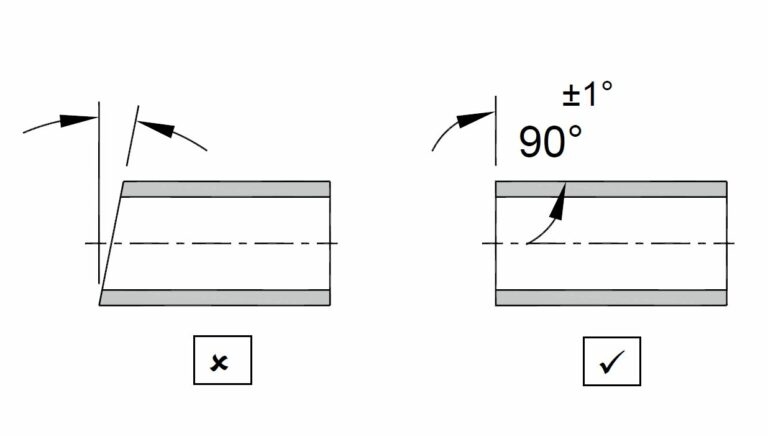
Most of the cases, tubes are cut randomly with a hand cutter. It is critical that the tube to be cut squarely within ±1° in order to assure the proper connection as shown below.
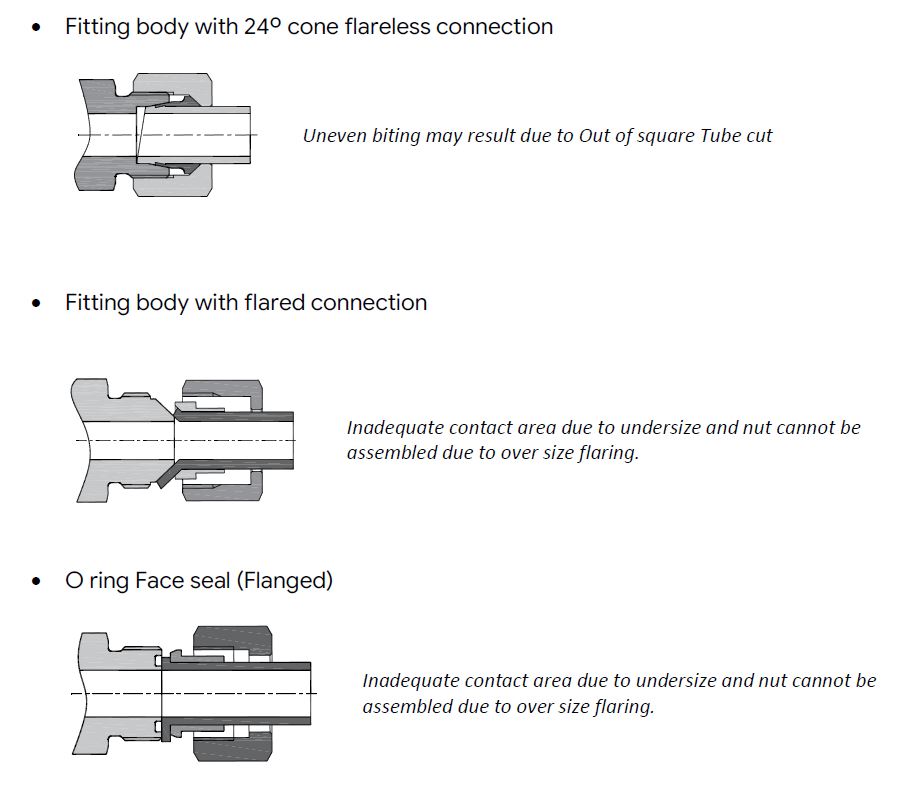
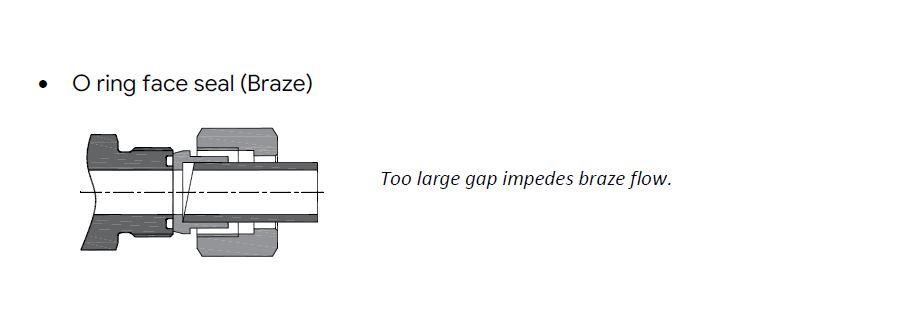
If it is not cut squarely, it will not rest properly in the most of the tube fittings types as shown below and possible results are also explained below.
When cutting any tube during preparation for flanging, brazing, flaring or pre-setting, a saw with a toothed blade is recommended. This type of tool will assure that the tube end is cut clean, with minimal burrs or contamination and is not exposed to excessive heat or working of material, typical of abrasive saws and tube cutters.
For Harder metal such as steel and stainless steel tubes, we recommend the use of a rotary toothed saw. However, if you do not have access to one, you can use a hacksaw with a saw guide instead.
Improper cut (left) and proper cut (right). The improper cut is showing what happens when a rotary cutter is used on harder materials, in this case steel.
Rotary tube cutters may be used with soft tube such as copper and aluminium. However, for steel and stainless tube rotary cutters will cold form the tube, hardening the material and creating excessive ID collapse or burr.
The hardened material causes problems during end forming. All of this can compromise the tube sealing surface.
When cutting your tube, make sure that the tube is securely in the vise, then slowly cut through the tube to minimize the burrs.
D – Deburring
Deburring the inside and outside diameter of the tube end is necessary to assure the tube fits properly inside the braze/flange/flare sleeve or ferrule and fitting body.
Proper deburring of the tube end is also necessary to form a tube flange or flare which is free of imperfections that may create a leak path between the tube and the fitting sealing surface.
You should lightly deburr the ID (Inner diameter) and OD (Outside diameter) of the tube end to remove burrs and sharp edges. You can use either a hand deburring tool or a power deburring machine.
It is important not to remove too much material when deburring tube ends as it can be detrimental. Just lightly breaking off the edge is sufficient.
Important Tip: If using a hand deburring tool, point the tube end downward while deburring to keep chips from entering the tube.
C – Cleaning
Debris may remain in the tube end from both the cutting and deburring processes. Debris present in the tube end can result in system contamination or can be lodged (or can embed itself) into the flange or flare, which may result in imperfections on the tube surface that can lead to potential leak paths.
It is recommended that the tube end to be cleaned properly prior to any further processing such as flanging, flaring, brazing or pre-setting.
To clean your tube after cutting and deburring, use a brush to remove chips from the inner diameter, then use a clean rag to wipe the inner and outer surfaces of the tube end.